Postalk
Postalk
0. 简介
这个项目是一个基于Spring boot, Mybatis, Druid, MySQL技术的web应用,其功能为发帖+聊天。该文章将会记录开发过程以及在过程之中所遇到的问题。
1. 设计部分
数据库设计
为了使开发更为顺利,我首先按照各实体类之间的关系,设计了该ER图。
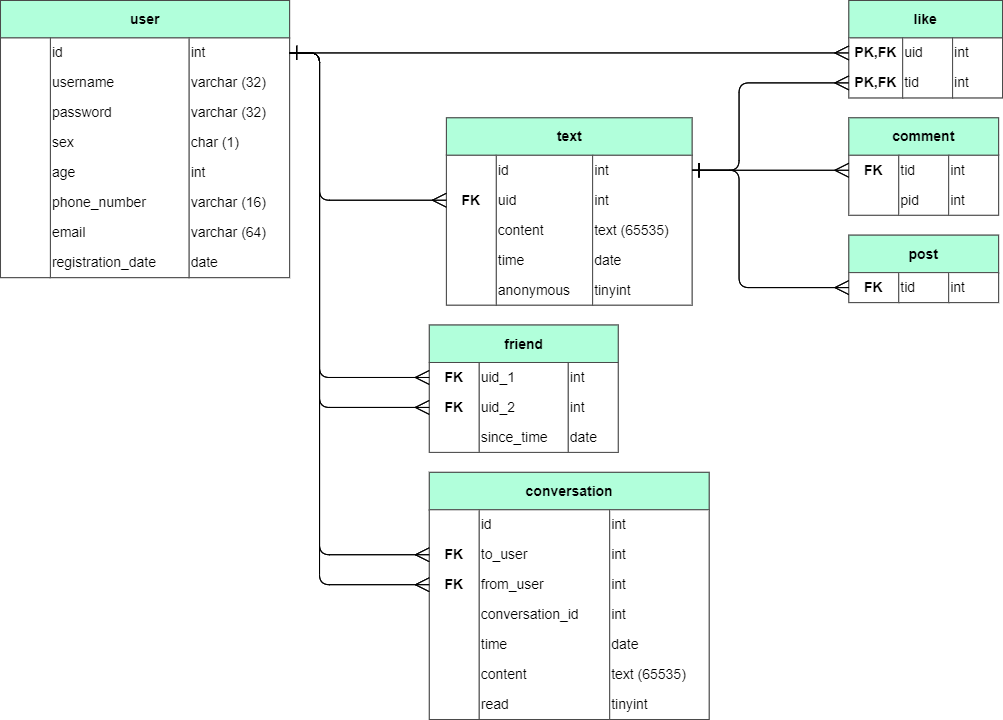
User表:
| id | username | password | sex | age | phone_number | registration_date | |
|---|---|---|---|---|---|---|---|
| 序号 | 用户名 | 密码 | 性别(F表示女性,M表示男性) | 年龄 | 电话号码 | 电子邮箱 | 注册时间 |
Text表:
| id | uid | content | time |
|---|---|---|---|
| 序号 | 用户序号 | 文本内容 | 发文时间 |
Comment表:
| tid | pid |
|---|---|
| 对应文本的序号 | 对应评价文本的序号 |
Post表:
| tid |
|---|
| 对应文本的序号 |
Like表:
| uid | tid |
|---|---|
| 对应用户的序号 | 对应文本的序号 |
Friend表:
| uid_1 | uid_2 | since_time |
|---|---|---|
| 用户1的序号 | 用户2的序号 | 从何时开始成为朋友 |
Conversation表:
| id | to_user | from_user | conversation_id | time | content | read |
|---|---|---|---|---|---|---|
| 该段对话的序号 | 发送人序号 | 接收人序号 | 相同两人之间的对话集合的序号 | 对话时间 | 对话内容 | 是否已读 |
RESTful风格架构设计
| 功能 | 请求URI | 请求方式 |
|---|---|---|
| 用户登录 | /user/login | GET |
| 跳转到添加用户界面 | /user/ | GET |
| 查询用户 | /user/{id} | GET |
| 用户注册 | /user/ | POST |
| 跳转到对应用户的主页 | /user/myPage | GET |
| 跳转到添加帖子界面 | /post/ | GET |
| 添加帖子 | /post/ | POST |
| 查询所有帖子 | /posts/ | GET |
| 查询所有该id对应的用户发的帖子 | /post/{id} | GET |
| 修改帖子 | /post/ | PUT |
| 删除帖子 | /post/{id} | DELETE |
| 点赞或取消赞 | /like/ | POST |
| 获得当前登录用户对应的所有朋友名单 | /friends/ | GET |
| 跳转到朋友搜索界面 | /friend/ | GET |
| 根据输入条件查找用户 | /friend/search/ | GET |
| 添加朋友 | /friend/ | POST |
| 删除朋友 | /friend/{id} | DELETE |
2. 搭建Mybatis+SpringBoot基础框架
配置Druid数据源
-
首先引入Druid的Maven依赖
<dependency> <groupId>com.alibaba</groupId> <artifactId>druid-spring-boot-starter</artifactId> <version>1.1.22</version> </dependency> -
然后在
application.yml中配置Datasourcespring: datasource: type: com.alibaba.druid.pool.DruidDataSource driver-class-name: com.mysql.cj.jdbc.Driver url: jdbc:mysql://localhost:3306/postalk?useUnicode=true&characterEncoding=utf-8&relaxAutoCommit=true&zeroDateTimeBehavior=convertToNull&allowMultiQueries=true&serverTimezone=GMT%2B8 password: root username: root druid: initial-size: 5 min-idle: 5 maxActive: 20 maxWait: 60000 timeBetweenEvictionRunsMillis: 60000 minEvictableIdleTimeMillis: 300000 validationQuery: SELECT 1 testWhileIdle: true testOnBorrow: false testOnReturn: false poolPreparedStatements: true maxPoolPreparedStatementPerConnectionSize: 20 filters: stat,wall,slf4j connectionProperties: druid.stat.mergeSql\=true;druid.stat.slowSqlMillis\=5000 web-stat-filter: enabled: true url-pattern: "/*" exclusions: "*.js,*.gif,*.jpg,*.bmp,*.png,*.css,*.ico,/druid/*" stat-view-servlet: url-pattern: "/druid/*" reset-enable: false login-username: admin login-password: 123456 enabled: true
实现各实体类
package xyz.aiinirii.postalk.bean;

import lombok.Data;
import lombok.EqualsAndHashCode;

import java.util.Date;

@Data
public class User {

    private int id;
    private String username;
    private String password;
    private String sex;
    private int age;
    private String phoneNumber;
    private String email;
    private Date registrationDate;
}

@Data
public abstract class Text {

    private int id;
    private String content;
    private Date time;

    private User user;
}

@EqualsAndHashCode(callSuper = true)
@Data
public class Comment extends Text{

    private Text text;
}

@EqualsAndHashCode(callSuper = true)
@Data
public class Post extends Text{
}

@Data
public class Like {

    private User user;
    private Text text;
}

@Data
public class Friend {

    private User user1;
    private User user2;
    private Data sinceTime;
}

@Data
public class Conversation {

    private int id;
    private User toUser;
    private User fromUser;
    private int conversationId;
    private Date time;
    private String content;
    private boolean read;
}
3. 用户模块
实现User的CURD操作
Mapper 实现
package xyz.aiinirii.postalk.mapper;

import org.apache.ibatis.annotations.*;
import org.springframework.stereotype.Repository;
import xyz.aiinirii.postalk.bean.User;

import java.util.List;

/**
 * @author AIINIRII
 */
@Mapper
@Repository
public interface UserMapper {

    @Select("select * from user")
    List<User> findAllUser();

    @Select("select * from user where id=#{id}")
    User findUserById(Integer id);

    @Select("delete from user where id=#{id}")
    int deleteUserById(Integer id);

    @Options(useGeneratedKeys = true, keyProperty = "id")
    @Insert("insert into user(username, password, sex, age, phone_number, email, registration_date) values (#{username}, #{password}, #{sex}, #{age}, #{phoneNumber}, #{email}, #{registrationDate})")
    void insertUser(User user);

    @Insert("update user set username=#{username}, password=#{password}, sex=#{sex}, age=#{age}, phone_number=#{phoneNumber}, email=#{email}, registration_date=#{registration_date} where id=#{id}")
    int updateUser(User user);
}
登录注册功能实现
Controller类代码实现
package xyz.aiinirii.postalk.controller;

import org.springframework.beans.factory.annotation.Autowired;
import org.springframework.stereotype.Controller;
import org.springframework.web.bind.annotation.GetMapping;
import org.springframework.web.bind.annotation.PathVariable;
import org.springframework.web.bind.annotation.PostMapping;
import org.springframework.web.bind.annotation.RequestMapping;
import org.springframework.web.servlet.ModelAndView;
import xyz.aiinirii.postalk.bean.User;
import xyz.aiinirii.postalk.service.UserService;

import java.util.LinkedList;
import java.util.List;

/**
 * @author AIINIRII
 */
@Controller
public class UserController {

    UserService userService = new UserService();

    @Autowired
    public void setUserService(UserService userService) {
        this.userService = userService;
    }

    @PostMapping("/user/login")
    public ModelAndView checkUser(User user, ModelAndView modelAndView){
        int res = userService.checkUser(user);
        modelAndView.addObject("checkResult", res);
        if (res == 0) {
            modelAndView.setViewName("/post/index");
        } else {
            modelAndView.setViewName("/index");
        }
        return modelAndView;
    }

    @GetMapping("/user/{id}")
    public ModelAndView findUserById(@PathVariable("id") Integer id, ModelAndView modelAndView) {
        User user = userService.findUserById(id);
        modelAndView.setViewName("user/list");
        List<User> users = new LinkedList<>();
        users.add(user);
        modelAndView.addObject("users", users);
        return modelAndView;
    }

    @GetMapping("/user")
    public String toRegisterPage(){
        return "user/update";
    }

    @PostMapping("/user")
    public ModelAndView registerUser(User user, ModelAndView modelAndView) {

        int res = userService.registerUser(user);
        if (res == 0) {
            // success insert, go to login page
            modelAndView.setViewName("/index");
        } else if (res == 1){
            // the username is used, go back to the register page
            modelAndView.addObject("userR", user);
            modelAndView.setViewName("/user/update");
        }
        return modelAndView;
    }
}
前端代码实现(首页)
<!DOCTYPE html>
<html lang="en" xmlns:th="http://www.thymeleaf.org">
<head>
    <meta http-equiv="Content-Type" content="text/html; charset=UTF-8">
    <meta name="viewport" content="width=device-width, initial-scale=1, shrink-to-fit=no">
    <meta name="description" content="">
    <meta name="author" content="">
    <title>Signin Template for Bootstrap</title>
    <!-- Bootstrap core CSS -->
    <link href="/asserts/css/bootstrap.min.css" rel="stylesheet">
    <!-- Custom styles for this template -->
    <link href="/asserts/css/signin.css" rel="stylesheet">
</head>

<body class="text-center">
<div>
<form class="form-signin" method="post" th:action="@{/user/login}">
    <img class="mb-4" src="/asserts/img/bootstrap-solid.svg" alt="" width="72" height="72">
    <h1 class="h3 mb-3 font-weight-normal">Please sign in</h1>
    <p style="color: #b21f2d" th:if="${checkResult == 1}">wrong password</p>
    <p style="color: #b21f2d" th:if="${checkResult == 2}">no such user</p>
    <label class="sr-only">Username</label>
    <label>
        <input name="username" type="text" class="form-control" placeholder="Username" required="" autofocus=""/>
    </label>
    <label class="sr-only">Password</label>
    <label>
        <input name="password" type="password" class="form-control" placeholder="Password" required=""/>
    </label>
    <div class="checkbox mb-3">
        <label>
            <input type="checkbox" value="remember-me"/> Remember me
        </label>
    </div>
    <button class="btn btn-lg btn-primary btn-block" type="submit">Sign in</button>
</form>
<form class="form-signin" action="/user/" method="get">
    <button class="btn btn-lg btn-success btn-block" type="submit">Register</button>
</form>
<p class="mt-5 mb-3 text-muted">© 2019-2020</p>
</div>
</body>

</html>
前端代码实现(注册界面)
<!DOCTYPE html>
<html lang="en" xmlns:th="http://www.thymeleaf.org">
<style>
    #wrapper {
        width: 60%;
        margin: 0 auto;
        border: 0;
    }
</style>
<head>
    <meta http-equiv="Content-Type" content="text/html; charset=UTF-8">
    <title>Register</title>
    <!-- Bootstrap core CSS -->
    <link href="/asserts/css/bootstrap.min.css" rel="stylesheet">
    <!-- Custom styles for this template -->
    <!--<link href="/asserts/css/signin.css" rel="stylesheet">-->
</head>
<body>
<div id="wrapper">
    <form class="needs-validation" novalidate method="post" action="/user">
        <div class="form-group row">
            <label for="inputUsername" class="col-sm-2 col-form-label">User name*</label>
            <div class="col-sm-10 mb-3">
                <input name="username" type="text" class="form-control" id="inputUsername" th:value="${userR!=null}?${userR.username}" required>
                <div class="valid-feedback">
                    Looks good!
                </div>
                <div class="invalid-feedback">
                    Please enter a valid username.
                </div>
            </div>
        </div>
        <div class="form-group row">
            <label for="inputPassword" class="col-sm-2 col-form-label">Password*</label>
            <div class="col-sm-10">
                <input name="password" type="password" class="form-control" id="inputPassword" required>
                <div class="valid-feedback">
                    Looks good!
                </div>
                <div class="invalid-feedback">
                    Please enter a valid password.
                </div>
            </div>
        </div>
        <fieldset class="form-group">
            <div class="row">
                <legend class="col-form-label col-sm-2 pt-0">Gender*</legend>
                <div class="col-sm-10">
                    <div class="form-check">
                        <input class="form-check-input" type="radio" name="sex" id="gridRadios1" value="M"  th:checked="${userR!=null}?${userR.sex=='M'}" checked>
                        <label class="form-check-label" for="gridRadios1">
                            Male
                        </label>
                    </div>
                    <div class="form-check">
                        <input class="form-check-input" type="radio" name="sex" id="gridRadios2" th:checked="${userR!=null}?${userR.sex=='F'}" value="F">
                        <label class="form-check-label" for="gridRadios2">
                            Female
                        </label>
                    </div>
                </div>
            </div>
        </fieldset>
        <div class="form-group row">
            <label for="inputAge" class="col-sm-2 col-form-label">Age*</label>
            <div class="col-sm-10">
                <input name="age" type="number" class="form-control" id="inputAge" th:value="${userR!=null}?${userR.age}" required>
                <div class="valid-feedback">
                    Looks good!
                </div>
                <div class="invalid-feedback">
                    Please enter a valid age.
                </div>
            </div>
        </div>
        <div class="form-group row">
            <label for="inputPhoneNumber" class="col-sm-2 col-form-label">Phone number</label>
            <div class="col-sm-10">
                <input name="phoneNumber" type="text" class="form-control" th:value="${userR!=null}?${userR.phoneNumber}" id="inputPhoneNumber">
                <div class="valid-feedback">
                    Looks good!
                </div>
                <div class="invalid-feedback">
                    Please enter a valid phone number.
                </div>
            </div>
        </div>
        <div class="form-group row">
            <label for="inputEmail" class="col-sm-2 col-form-label">Email</label>
            <div class="col-sm-10">
                <input name="email" type="email" class="form-control" th:value="${userR!=null}?${userR.email}" id="inputEmail">
                <div class="valid-feedback">
                    Looks good!
                </div>
                <div class="invalid-feedback">
                    Please enter a valid email.
                </div>
            </div>
        </div>
        <div class="form-group row">
            <div class="col-sm-10">
                <button type="submit" class="btn btn-primary">Sign in</button>
            </div>
        </div>
    </form>
</div>
</body>
<script>
    // Example starter JavaScript for disabling form submissions if there are invalid fields
    (function () {
        'use strict';
        window.addEventListener('load', function () {
            // Fetch all the forms we want to apply custom Bootstrap validation styles to
            var forms = document.getElementsByClassName('needs-validation');
            // Loop over them and prevent submission
            var validation = Array.prototype.filter.call(forms, function (form) {
                form.addEventListener('submit', function (event) {
                    if (form.checkValidity() === false) {
                        event.preventDefault();
                        event.stopPropagation();
                    }
                    form.classList.add('was-validated');
                }, false);
            });
        }, false);
    })();
</script>
</html>
4. 帖子模块
基本的增删改查
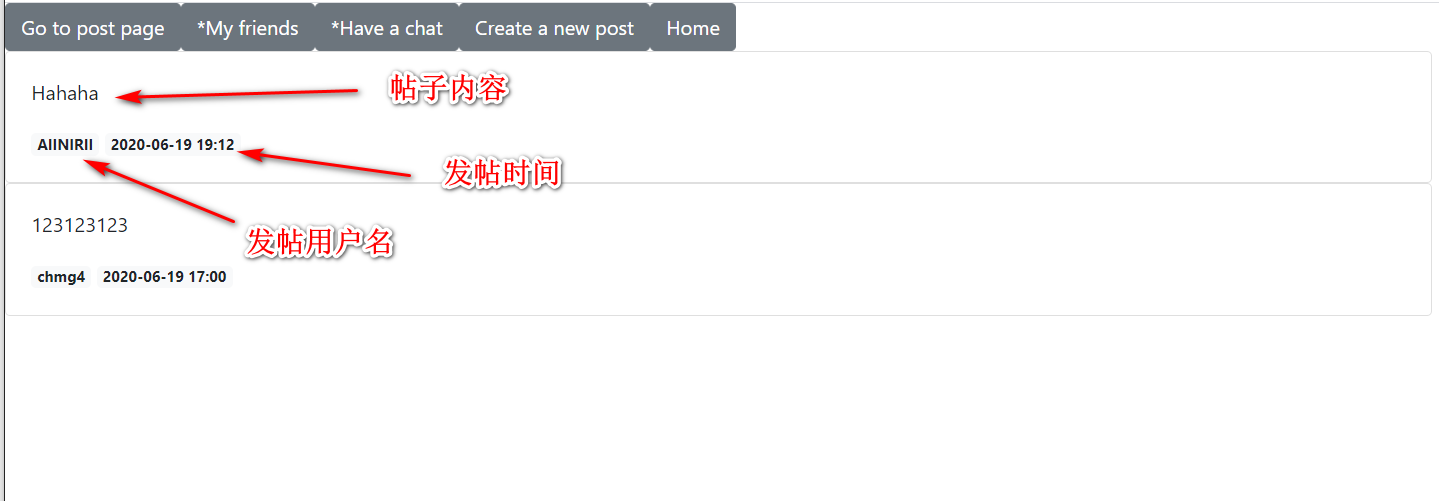
先贴上效果图:
-
主页面:可以看到平台上所有用户的帖子 -
-
用户主页面:可以看到自己发的所有帖子,而且能够进行修改和删除 -

-
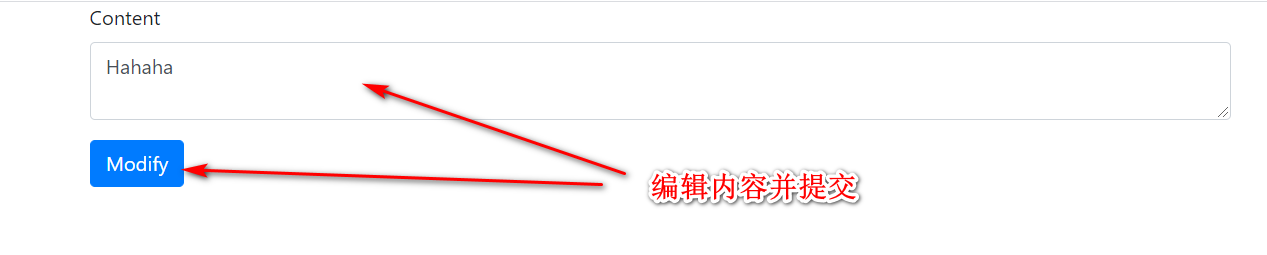
修改界面:这里用户可以编辑内容并提交 -
-
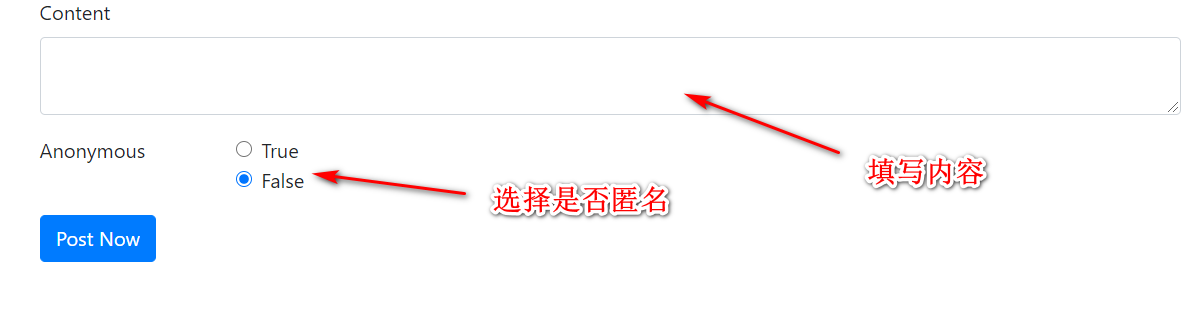
发帖页面:这里可以发帖 -
因为代码太多,这里就不贴出来了,主要说几个遇到的问题:
-
基于注解的懒加载
    @Select("select * from post left join text t on post.tid = t.id where tid = #{id}")
    @Results(id = "findPostById",
            value = {
                    @Result(id = true, column = "tid", property = "id"),
                    @Result(column = "content", property = "content"),
                    @Result(column = "time", property = "time"),
                    @Result(column = "uid", property = "user",
                            one = @One(select = "xyz.aiinirii.postalk.mapper.UserMapper.findUserById",
                                       fetchType = FetchType.LAZY))
            }
    )
    Post findPostById(Integer id);
其中
@Result(column = "uid", property = "user", one = @One(select = "xyz.aiinirii.postalk.mapper.UserMapper.findUserById", fetchType = FetchType.LAZY))所实现的效果是根据findUserById这个类,根据提供的uid查询到user对象,并且只有当user被使用了,即调用了getUser()方法后才会执行查询。 -
如何使用HTML发送put、delete请求
其中前端代码为:
<form action="/post/" method="post" class="needs-validation" novalidate>
    <input type="hidden" name="_method" value="put" th:if="${post!=null}"/>
    <input type="hidden" name="id" th:value="${post.getId()}" th:if="${post!=null}"/>
这里给的是一个发送put请求的例子,其实form表单是不支持发送put请求的,但是我们可以加一个
<input type="hidden" name="_method" value="put" th:if="${post!=null}"/>在form表单中,其中字段名必须为_method而value应该为希望的请求方式。而这种发送请求的方式,则需要服务端进行form表单的解析,而spring则可以做到这一点,但是需要配置,在application.yml文件中:spring: mvc: hiddenmethod: filter: enabled: true
点赞功能实现
-
赞数显示
思路:每次加载页面时自动查询赞数,并显示在页面上。
相关LikeMapper代码:
@Mapper
@Repository
public interface LikeMapper {

    @Select("select * from `like` where tid = #{tid}")
    @Results(
            id = "findLikeByTId",
            value = {
                    @Result(id = true, column = "tid", property = "text", one = @One(select = "xyz.aiinirii.postalk.mapper.TextMapper.findTextById", fetchType = FetchType.LAZY)),
                    @Result(id = true, column = "uid", property = "user", one = @One(select = "xyz.aiinirii.postalk.mapper.UserMapper.findUserById", fetchType = FetchType.LAZY))
            }
    )
    List<Like> findLikeByTId(Integer tid);
}
除此之外我们还需将
Post和PostMapper进行调整,每次查询Post时使用懒加载的方式(因为其实需要用到Like的情况并不多)去加载Post中的likes。@Data public abstract class Text implements Serializable { private Integer id; private String content; private Date time; private boolean anonymous = false; private User user; // 新加入likes属性 private List<Like> likes; }下面是
PostMapper类,主要改动是在每个查询方法上的@Result内加入了@Result(id = true, column = "tid", property = "likes", many = @Many(select = "xyz.aiinirii.postalk.mapper.LikeMapper.findLikeByTId", fetchType = FetchType.LAZY))。@Mapper @Repository public interface PostMapper { @Select("select * from post p left join text t on p.tid = t.id where uid = #{id} ORDER BY t.time DESC") @Results(id = "findAllPostByUId", value = { @Result(id = true, column = "tid", property = "id"), @Result(column = "content", property = "content"), @Result(column = "time", property = "time"), @Result(column = "uid", property = "user", one = @One(select = "xyz.aiinirii.postalk.mapper.UserMapper.findUserById", fetchType = FetchType.LAZY)), @Result(id = true, column = "tid", property = "likes", many = @Many(select = "xyz.aiinirii.postalk.mapper.LikeMapper.findLikeByTId", fetchType = FetchType.LAZY)) } ) List<Post> findAllPostByUId(Integer id); @Select("select * from post left join text t on post.tid = t.id where tid = #{id}") @Results(id = "findPostById", value = { @Result(id = true, column = "tid", property = "id"), @Result(column = "content", property = "content"), @Result(column = "time", property = "time"), @Result(column = "uid", property = "user", one = @One(select = "xyz.aiinirii.postalk.mapper.UserMapper.findUserById", fetchType = FetchType.LAZY)), @Result(id = true, column = "tid", property = "likes", many = @Many(select = "xyz.aiinirii.postalk.mapper.LikeMapper.findLikeByTId", fetchType = FetchType.LAZY)) } ) Post findPostById(Integer id); @Select("select * from post p left join text t on p.tid = t.id ORDER BY t.time DESC") @Results(id = "findAllPost", value = { @Result(id = true, column = "tid", property = "id"), @Result(column = "content", property = "content"), @Result(column = "time", property = "time"), @Result(column = "uid", property = "user", one = @One(select = "xyz.aiinirii.postalk.mapper.UserMapper.findUserById", fetchType = FetchType.LAZY)), @Result(id = true, column = "tid", property = "likes", many = @Many(select = "xyz.aiinirii.postalk.mapper.LikeMapper.findLikeByTId", fetchType = FetchType.LAZY)) } ) List<Post> findAllPost(); }这样一来,每次我们需要查询Post的赞数时,我们只需要调用
post.getLikes().size()方法。 -
点击按钮增加赞数
思路:点击按钮时调用
LikeService中的like方法,对传入的uid和tid进行查询,如果发现在like表中没有字段,则执行insert方法。 -
再次点击按钮减少赞数
思路:同增加赞数的思想,只是如果发现
like表中有字段时才会执行delete方法。以下是service层方法。
@Service
public class LikeService {

    LikeMapper likeMapper;

    @Autowired
    public void setLikeMapper(LikeMapper likeMapper) {
        this.likeMapper = likeMapper;
    }

    /**
     * add like if the user haven't liked,
     * delete like if the user already have liked
     *
     * @param tid text's id
     * @param uid user's id
     * @return true if the operation is success
     */
    @Transactional(propagation = Propagation.REQUIRED)
    public boolean like(Integer tid, Integer uid) {
        Like like = likeMapper.findLikeByTIdUId(tid, uid);
        if (like == null) {
            return likeMapper.insertLike(tid, uid) == 1;
        } else {
            return likeMapper.deleteLike(tid, uid) == 1;
        }
    }
}
匿名显示
只需要稍微对前端代码进行修改就可以了:
<a href="#" class="badge badge-light" th:text="${!post.anonymous?post.user.username:'anonymous'}"></a>
这里加入一处判断,倘若post是匿名的,则不会显示用户的名字。
5. 好友模块
有了之前的基础,这一模块就相对简单了,主要是实现以下几个特性:
- 根据ID或用户名查找好友
- 添加好友
- 删除好友
好友相关界面一览:


根据ID或用户名查找好友
这一部分主要使用的是userService有关的接口去操作,以下是controller层代码:
@GetMapping("/friends/")
public ModelAndView toMyFriendPage(ModelAndView modelAndView,
                                   @SessionAttribute("loginUser") User user) {
    List<User> friends = friendService.findAllFriendsByUId(user.getId());
    modelAndView.addObject("friends", friends);
    modelAndView.setViewName("friend/myFriend");
    return modelAndView;
}

@GetMapping("/friend/search/")
public ModelAndView findFriend(ModelAndView modelAndView,
                               @Param("findWay") String findWay,
                               @Param("inputSearch") String inputSearch,
                               @SessionAttribute("loginUser") User user) throws Exception {
    List<User> friends = new LinkedList<>();
    if (findWay.equals("id") && !user.getId().equals(Integer.valueOf(inputSearch))) {
        friends.add(userService.findUserById(Integer.valueOf(inputSearch)));
    } else if (findWay.equals("username") && !user.getUsername().equals(inputSearch)) {
        friends = userService.findUserByUsername(inputSearch);
    } else {
        throw new Exception("Wrong with the findWay");
    }
    modelAndView.setViewName("/friend/result");
    modelAndView.addObject("friends", friends);
    return modelAndView;
}
添加好友
@PostMapping("/friend/")
private ModelAndView addFriend(ModelAndView modelAndView,
                               Integer id,
                               @SessionAttribute("loginUser") User user) {
    friendService.addFriend(user.getId(), id);
    List<User> friends = friendService.findAllFriendsByUId(user.getId());
    modelAndView.addObject("friends", friends);
    modelAndView.setViewName("friend/myFriend");
    return modelAndView;
}
可以看到,这里主要是调用了service层的addFriend方法。具体操作便是向friend表单中插入字段。
删除好友
@DeleteMapping("/friend/{id}")
public ModelAndView deleteFriend(ModelAndView modelAndView,
                                 @PathVariable("id") Integer id,
                                 @SessionAttribute("loginUser") User user) throws Exception {

    if (!friendService.deleteFriendById(user.getId(), id)) {
        throw new Exception("the delete operation failed");
    } else {
        List<User> friends = friendService.findAllFriendsByUId(user.getId());
        modelAndView.addObject("friends", friends);
        modelAndView.setViewName("friend/myFriend");
    }
    return modelAndView;
}
这里用了delete方法,倘若搜索不到该用户,该方法会发出异常。
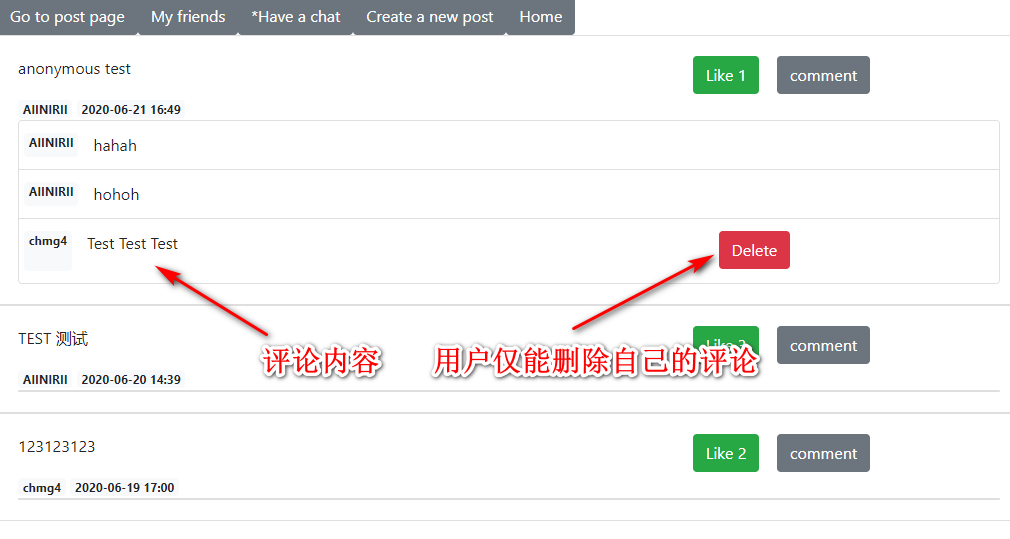
6. 评论模块
评论模块需要实现以下几个功能:
- 评论的创建删除修改匿名和显示
- 贴主可以管理评论,可以对评论进行删除操作
效果图:
评论的创建删除修改和匿名
Service层
这里的要点是两个service层的方法:
    @Transactional(propagation = Propagation.REQUIRED)
    public void createComment(Integer pid, Comment comment, User user) {
        comment.setUser(user);
        comment.setTime(new Date(System.currentTimeMillis()));
        textMapper.insertText(comment);
        commentMapper.insertComment(pid);
    }

    @Transactional(propagation = Propagation.REQUIRED)
    public boolean deleteCommentById(Integer id, User user) throws Exception {
        if (commentMapper.findCommentById(id).getUser().getId().equals(user.getId())) {
            return commentMapper.deleteCommentById(id) == 1 &&
                    textMapper.deleteTextById(id) == 1;
        } else {
            throw new Exception("the user do not have right to delete the comment");
        }
    }
createComment在这里扮演的角色是执行comment的创建,这一点和post的创建过程是一样的;
而deleteCommentById方法则是和post的删除流程一样。
’仅可删除自己的comment‘功能实现
<div id="commentModule" class="card" style="width: auto">
    <ul class="list-group list-group-flush">
        <li th:each="comment: ${post.comments}" class="list-group-item">
            <div class="row">
                <a href="#" class="badge badge-light card-text"
                   th:text="${!comment.anonymous?comment.user.username:'anonymous'}">Light</a>
                <p class="card-text col-sm-8" th:text="${comment.content}">content</p>
                <form th:action="@{'/comment/' + ${comment.id}}" method="post" th:if="${session.loginUser.id == comment.user.id}">
                    <input type="hidden" name="_method" value="delete"/>
                    <button type="submit" class="btn btn-danger">Delete</button>
                </form>
            </div>
        </li>
    </ul>
</div>
注意到这里其实做了一个判断,如果登录的用户和该comment所属的用户不同的话,将不会出现表单。
同时为了防止恶意提交,在后台Service层也有相应的检查。
    @Transactional(propagation = Propagation.REQUIRED)
    public boolean deleteCommentById(Integer id, User user) throws Exception {
        if (commentMapper.findCommentById(id).getUser().getId().equals(user.getId())) { // 检查该用户是否有权删除
            return commentMapper.deleteCommentById(id) == 1 &&
                    textMapper.deleteTextById(id) == 1;
        } else {
            throw new Exception("the user do not have right to delete the comment");
        }
    }
贴主可以管理评论,可以对评论进行删除操作
效果图
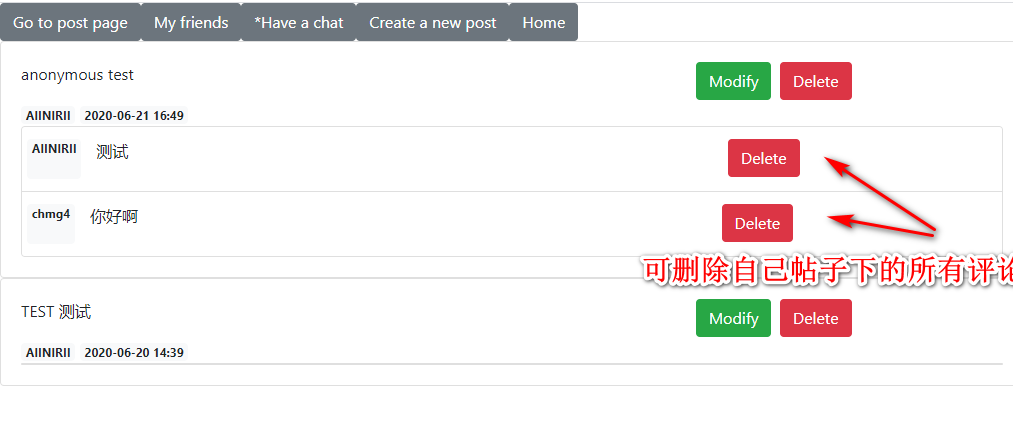
同之前的评论删除相似,这里仅仅是调整了各个评论的删除权限:
<!-- 前端代码调整,调整了按钮出现的逻辑 -->
<form th:action="@{'/comment/' + ${comment.id}}" method="post" th:if="${session.loginUser.id} == ${comment.user.id} or ${session.loginUser.id} == ${comment.text.user.id}">
// 后端service 层删除代码调整
@Transactional(propagation = Propagation.REQUIRED)
public boolean deleteCommentById(Integer id, User user) throws Exception {
    if (commentMapper.findCommentById(id).getUser().getId().equals(user.getId()) || commentMapper.findCommentById(id).getText().getUser().getId().equals(user.getId())) { // 加入了判断该评论的父贴子的用户是否为登录用户的逻辑
        return commentMapper.deleteCommentById(id) == 1 &&
            textMapper.deleteTextById(id) == 1;
    } else {
        throw new Exception("the user do not have right to delete the comment");
    }
}
那么到此为止,一个基础的贴吧就做好了,但其实还和计划时差了一点(没有聊天模块)。随着项目的进行,我也才发现,如果要完成聊天模块的话自己欠缺的知识其实还有许多,那就先欠着吧:-D,等以后闲下来再去学,然后再把这个瘸腿项目给完善了。
另注:该项目已开源,下面是github项目传送门,来一起进步啊~